Disclosure: This post contains affiliate links. If you sign up through our links, we earn a small commission at no extra cost to you. We only recommend tools we use and trust.
This post contains affiliate links. If you sign up through our links, we earn a small commission at no extra cost to you. We only recommend tools we use and trust.
Learn to build a client booking automation in 30 minutes using Make.com. When clients book sessions, they automatically receive personalized confirmation emails and get tagged in your subscriber list. This tutorial walks you through creating your first scenario from scratch, so you can build more automations faster and scale your coaching business without manual work.
Last reviewed: May 2026 by CoachAutomate Team
This tutorial builds one complete, useful automation from scratch: when a client books a session, they automatically receive a personalised confirmation email via Grow your audience with Kit and get added to your subscriber list with the correct tag. By the end of this guide you will have a working scenario running in Automate workflows with Make.com and a clear understanding of how to build more.
Related: Complete Guide to Coaching Automation
Related: Coaching Automation Workflows
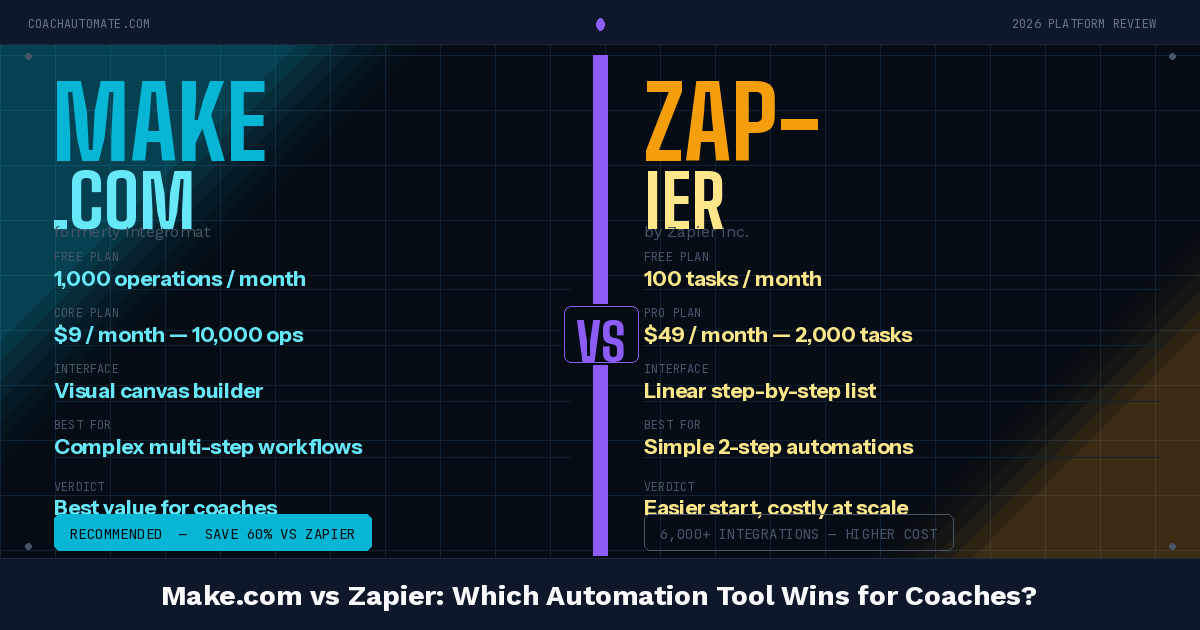
Related: Best Automation Tools for Coaches
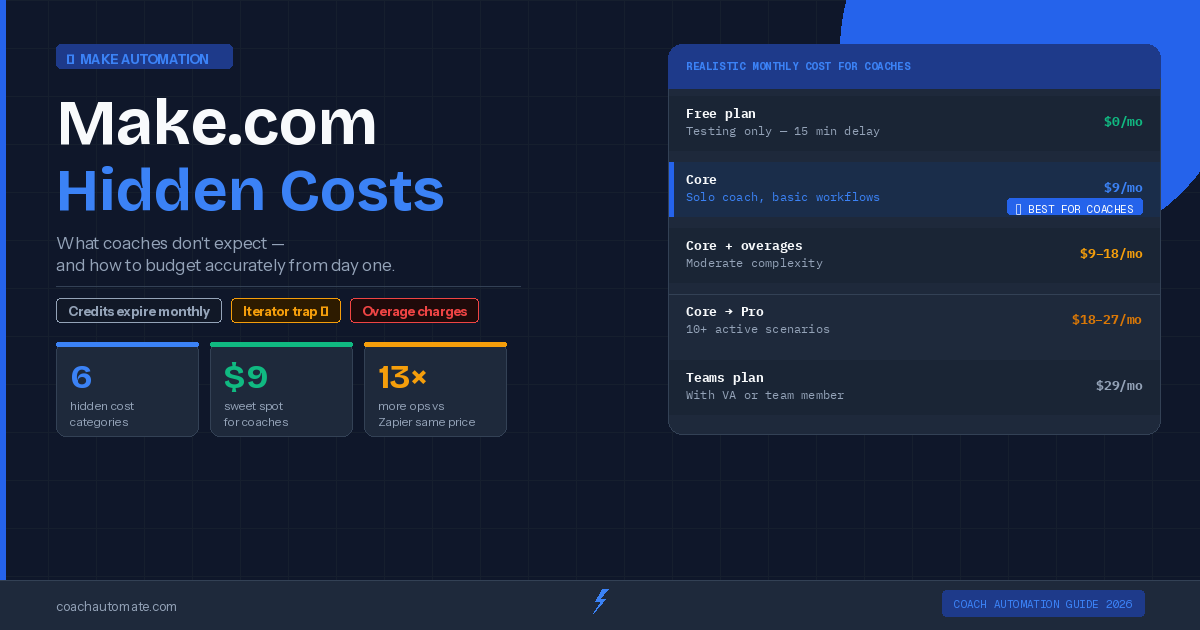
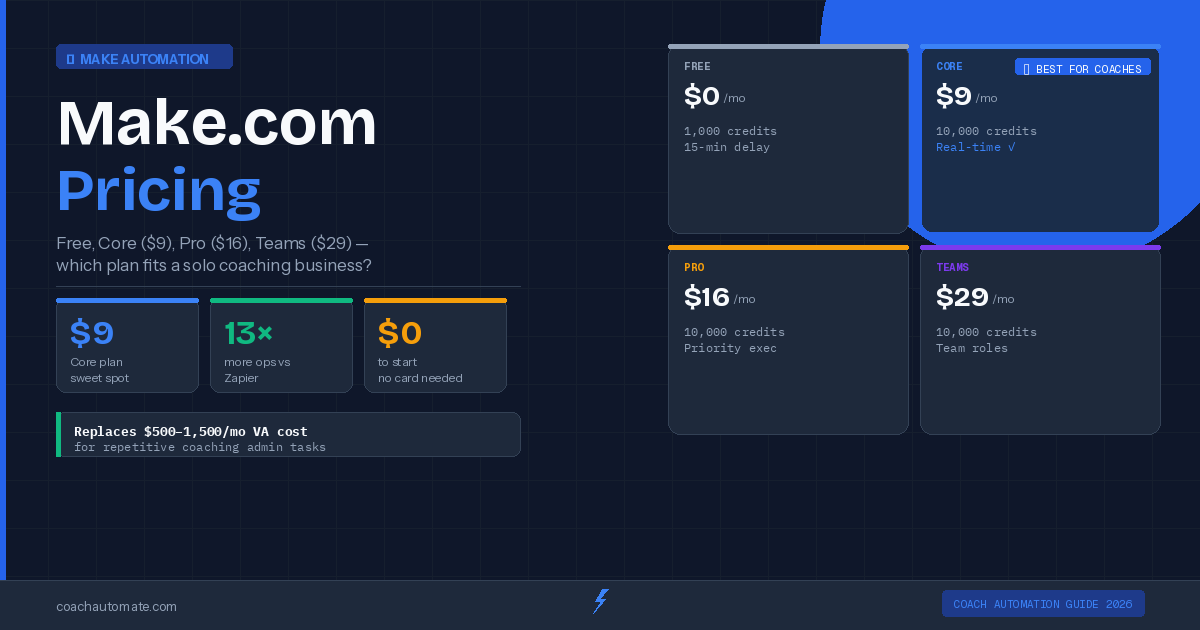
You need three things: a free Make.com account, a free Kit account, and a scheduling tool (SavvyCal or similar). All three have free plans — total setup cost is $0.
Step 1: Create Your Make.com Account
Go to automate workflows with Make.com and sign up for a free account. The free plan includes 1,000 operations per month and 2 active scenarios — enough to run everything in this tutorial. Once you are logged in, click 'Create a new scenario' from your dashboard.
Step 2: Add Your Trigger Module
Want this in PDF form?
Get the 24-page Coach Automation Playbook — every workflow in this article, plus 5 more, ready to implement this week.
✓ Check your inbox — the playbook is on its way!
No spam. Unsubscribe anytime.
The trigger is what starts your automation. Click the large circle on the canvas and search for your scheduling tool. If you use SavvyCal, search 'SavvyCal' and select 'Watch New Bookings'. If you use a different tool, search its name — most scheduling apps have native Make.com integrations. Connect your account when prompted and select which calendar to watch.
For real-time automation (confirmation emails that arrive within seconds of booking), use the Webhook trigger instead of a polling trigger. In Make.com, add a Webhooks module as your trigger, copy the webhook URL, and paste it into your scheduling tool's notification settings.
Step 3: Add a Kit Action Module
Click the '+' button after your trigger module to add a new action. Search for 'Kit' (or 'ConvertKit') and select 'Add a Subscriber'. Connect your Kit email marketing tools using your API key (found in Kit settings → Advanced → API). Map the booking data to Kit fields: the client's email goes to the Email field, their name to First Name. Add a tag like 'booked-session' so you can segment these subscribers later.
Step 4: Add an Email Send Action
Add another Kit module after the subscriber step: 'Send a Broadcast' or use Kit's sequence trigger to fire your pre-built welcome sequence. Map the booking details — session time, Zoom link, any preparation materials — into the email template. Use Make.com's text parser to format the date and time correctly for your timezone.
Step 5: Test and Activate
Click 'Run once' in Make.com to test your scenario with live data. Make a test booking in your scheduling tool and watch the scenario execute in real time — you can see each module process and verify the data mapping is correct. Once it runs successfully, click the toggle to activate the scenario. It now runs automatically every time a new booking is created.
This scenario now runs 24/7 without any input from you. Every new booking gets a confirmation email, gets added to Kit with the correct tag, and enters your welcome sequence automatically.
What to Build Next
Now that you understand the basics, the next workflows to build are the post-session follow-up sequence and the new client onboarding automation triggered by Stripe payments. Both follow the same pattern — trigger, then actions — and can be built in 20-30 minutes each. See our guide on the 5 Make.com workflows every coach needs for step-by-step instructions on each one.
Start Building on Make.com Today
Free plan includes 1,000 operations/month. No credit card required. Your first automation takes 30 minutes.
Start Make.com Free → →Get the Coach Automation Playbook — Free
Join 1,000+ coaches getting one practical automation tip every week. Includes the 24-page PDF playbook delivered instantly.
✓ Check your inbox — the playbook is on its way!
Something went wrong. Please try again.
No spam. Unsubscribe anytime. We respect your inbox.